How To Cook An Amazing Steak

How to Cook Steak on the Stove: The Simplest, Easiest Method | Kitchn

Many of us today struggle on how to cook things to the correct degree. Whether that be pasta which you want to be perfectly al dente, or chicken to make sure its cooked long enough to avoid salmonella. And cooking steak is no less difficult, some would say it is even harder in fact. Due to the chef having to achieve the requested temperature on the steak without burning the outside. Steak can be a daunting task to undergo in the kitchen however if you follow the steps I lay out below and practice, you will one day be a master at cooking steaks.

What Steak Should You Choose?

Otto's Steak Chart: 12 Beef Cuts You Should Know - Otto Wilde Grillers

As you can see from the picture above there are 11 cuts of steak that are most notable and you can tell how the individual steaks themselves will taste and feel by knowing where they are from on a cow. And knowing is half the battle. For this blog post I will be talking mostly about the filet and sirloin steak because those are the cuts which I have the most experience cooking.

Filets are the king cuts of steak, the most expensive and in many peoples opinions the most delicious. In many Michelin star restaurants around the world the filet is the choice dish on the menu and for good reason. In each cow there is typically only 500 grams worth of filet steaks which is not a lot. This is, along with the quality of the cut, is why this steak is so heavily sought after.

Next we have the sirloin steak. This is a cheaper but perfectly delicious cut of beef. Like the filet it is a lean but juicy cut of beef that is more affordable for regular cooking compared to filets. When I cook steak I will typically choose the sirloin over the filet due to the price difference and the ability to cook a sirloin steak easier than a filet. The filets are more round and taller cuts than the sirloin. Having the sirloin being able to have more contact with the pan means there is a more even cook on the steak. Now we will go over how to cook these beautiful steaks to perfection and what temperature you should cook them at.

Temperature of the Steak:

Steak Doneness Guide & Temperature Charts – Omaha Steaks

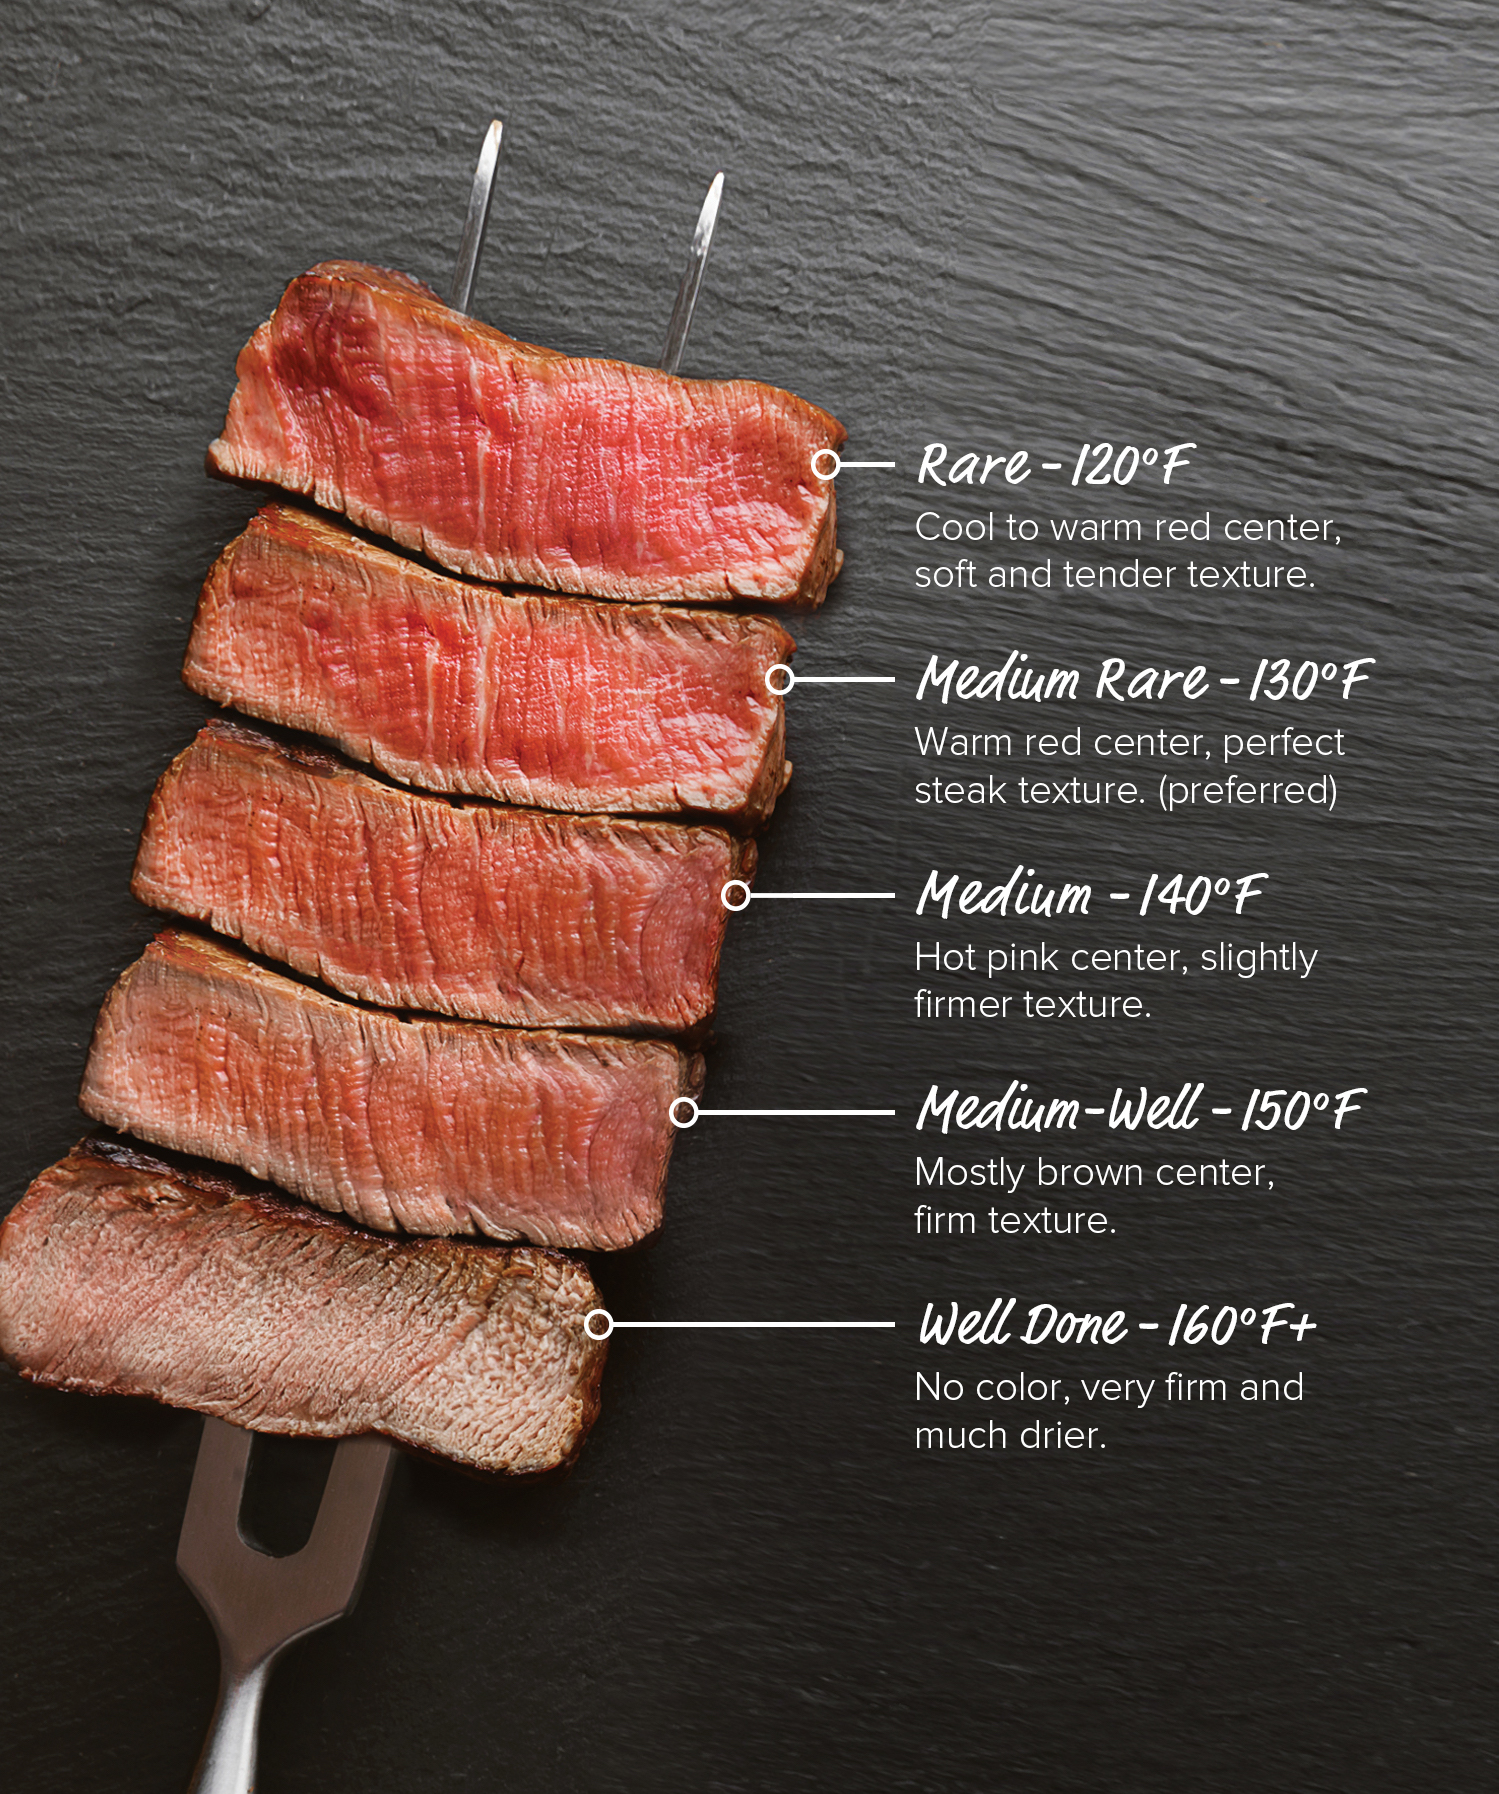
Choosing your preferred temperature goes a long way into how your steaks are going to taste. In my opinion there is a right temperature to cook your steak at and a really wrong temperature that should only be chosen for the pickiest of eaters. As you can see from the picture above there are five temperatures at which you can cook your steak (rare, medium-rare, medium, medium-well, and well).

The general consensuses for those who are steak aficionados is that you should cook your steak between medium rare and medium well. Rare steaks in my opinion are fine but they can be a little too chewy for me. Medium-rare is my temperature of choice when eating a steak because its juicy and not chewy like rare steak it, but medium is also a perfectly good temperature to have a steak. The only temperature you should never order a steak or cook a steak at is well. Well done steaks are a cardinal sin. They are dry and chewy and not at all what you want a steak to taste like after spending money on it.

Onto the Pan:

Cast-Iron Skillet Steak Recipe | Taste of Home

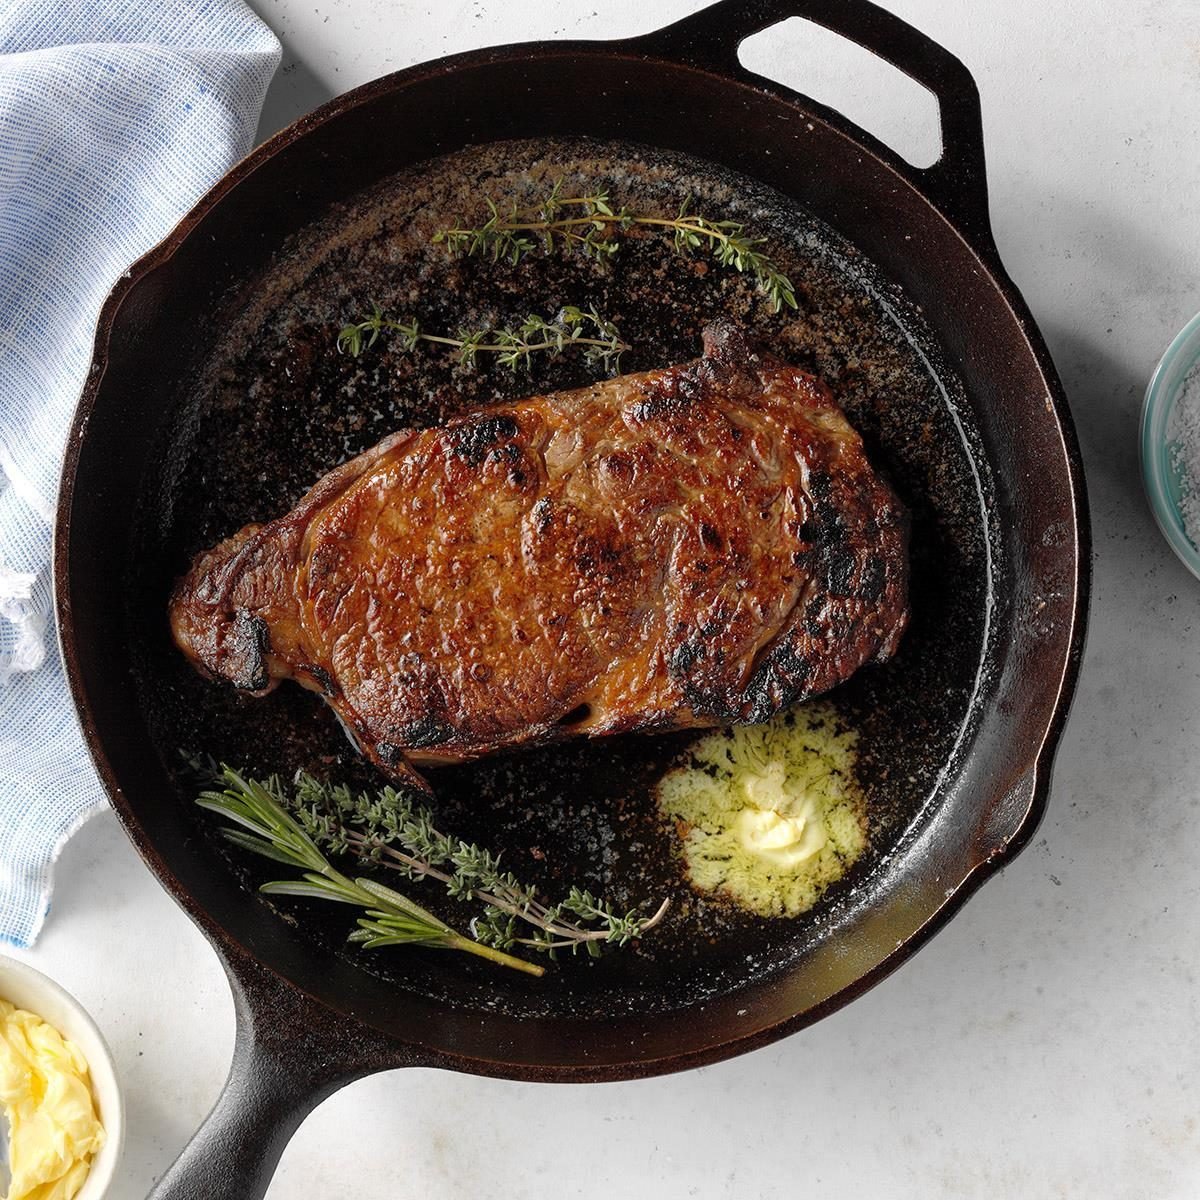
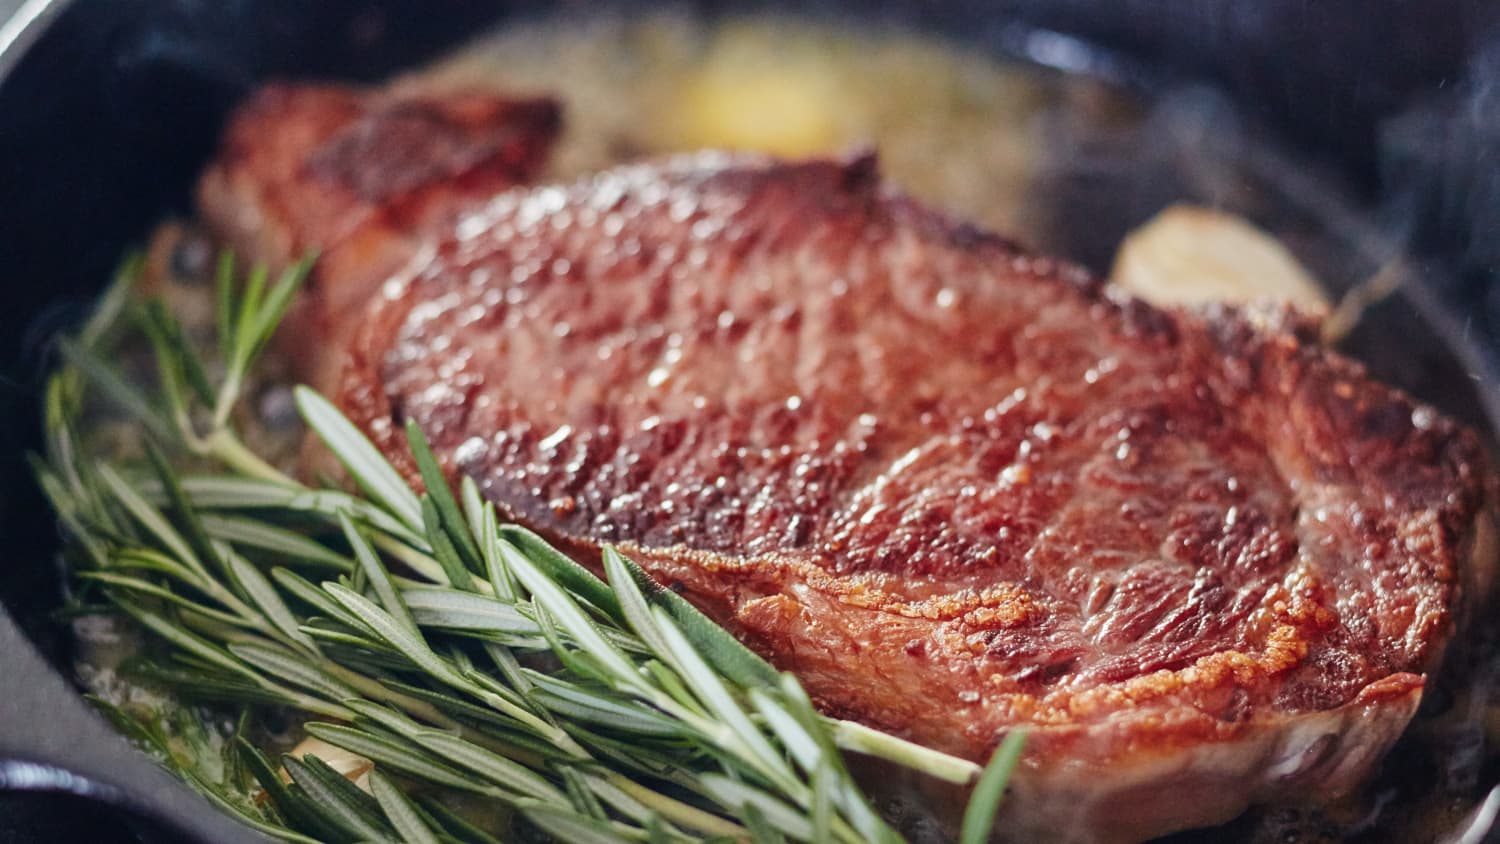
Now its time to get technical because there are many good ways of cooking a steak. My favorite and the way I will be teaching you is the stove top method in a cast iron pan. Cast iron can be tricky to use because it conducts heat extremely fast. But if you follow these steps you will succeed in cooking a beautiful steak to your desired temperature. I highly recommend watching Gordon Ramsay on YouTube cooking steak, he is an very good teacher and cook his steaks with professional chef quality. I have linked a video below.

Step #1:

The first step in cooking any kind of meat is making sure that the protein is at room temperature before you cook them. If they are at room temperature before you put them in the pan then it will ensure that the center of the meat is not cold and therefore undercooked. Take the steak out of the fridge at least 15 minutes before putting it in the pan so it has the opportunity to warm up to room temperature. At this step I also recommend you to begin heating up your pan over medium heat. By the time the 15 minutes are up your pan will be plenty hot

Step #2:

Now after letting the steak warm up you must season every inch of the steak with salt and pepper or whatever kind of rub you wish to choose. You want to season it generously because you lose 35% of all seasoning in the pan. With this step you also want to prepare your aromatics for the steaks. For steaks I recommend using rosemary, thyme, garlic and butter.

Step #3:

Now we finally get to cooking the steak. Pour about one to two tablespoons of olive oil in the pan and let it heat up. You will notice that it is hot when the oil begins to look watery in the pan. When this happens you may now place your steak in the pan. Just make sure you lay your steak away from you so you do not splash oil on yourself. If you place the steak in the pan and it does not sizzle immediately then do not put the steak in. The sizzle ensures that you actually cook your steak and get a great sear on it.

Step #4:

Once the steak is in the pan move it as less as possible. The more you move the steak the more juice and flavor seeps out of the meat. Depending on how thick your steak is and how hot your pan gets changes how long you cook it for. A good rule is to cook each side for roughly 2-3 minutes to get a good sear on each side. This will not cook the inside of the steak but we will shortly get to doing that.

Step #5:

Now we will add our aromatics to the pan so that they may infuse more flavors into the steak. Lightly crush your garlic and put it into the pan with some butter and the herbs listed above. Cook those aromatics for a minute or so and once they have cooked place them on top of the steak itself. When the butter has melted and begun to foam tilt the pan slightly and with a spoon begin basting the steak with the butter. the butter will now be infusing the flavor of the garlic and herbs and the steak will absorb these flavors and it will help cook the steak from the inside.

Step #6:

After cooking your steak in the butter for about a minute or two flip the steak onto any side that has a cap of fat (if there is one) and render that fat down. the heat from the pan with cook the fat and ensure that it is not chewy and inedible. After cooking that fat down for about 30 seconds take the steak out of the pan and place it on a plate. Place those aromatics on top of your steak and pour over the steak juices left in the pan over the steak. Now for one of the most important steps in the cooking process. Let the steak rest for as long as you cook it for. This will ensure that your steak continues to cook all the way through and so that your steak does not bleed all over the plate when you cut it.

Pan Seared Steak Recipe (Steakhouse Quality!) - NatashasKitchen.com

I do not portray myself to be an expert in the cooking of steak or cooking at all for that matter. However this has always worked for me and it makes a delicious steaks. I recommend you to try different ways of cooking a steak as well because experimenting in the kitchen can lead to delicious outcomes. Try grilling, sous-vide, oven cooked and many other forms of cooking your steaks to find what you like the best. Because cooking a steak is all about cooking it how you like it.

Making Homemade Pasta

How to Make Homemade Pasta - Recipe & Tips | Self Proclaimed Foodie

Making homemade pasta is a wonderful and skillful way to turn your ordinary pasta dish into an extraordinary culinary delight. Although I admit this is not necessary in most cooking. To those who are trying to up their culinary game, this is a first and easy step to going from homecooked to aspiring chef. And even though to many this can seem difficult, having the right technique and tools can make this creative skill quick and easy to learn.

Firstly there will be some necessary tools and items you should get if you want you pasta to look as though its made in a world class Italian bistro. Below you will find a comprehensive list to the items you can use and a step by step guide on how to make and learn this craft. I will also add that learning from youtube videos can help easy your anxiety towards learning a craft like this and I have taken the liberty of linking a fantastic guide on how to make fresh pasta made by the youtube channel Binging With Babish. And I have also linked his website and individual page on making fresh pasta at home.

Binging With Babish Website: https://www.bingingwithbabish.com/

Binging with Babish Fresh Pasta Page: https://basicswithbabish.co/basicsepisodes/2017/10/23/sauces-9w5tm-2njph

List of Traditional Supplies:

  • Flour
  • Eggs
  • Rolling Pin
  • Sharp Knife
  • Fork
  • Plastic Wrap (or Cling Wrap)

List of Optional Supplies:

I only name this list the optional supplies because with the list above you can make fresh pasta however if you use this list you can have an easier time and get more uniform looking pasta. And also this list has more expensive items to purchase that are not necessary but help.

  • Include everything from above list
  • Pasta Machine
  • Stand Mixer

Getting Started:

How to Make Fresh Pasta | Williams-Sonoma Taste

The picture above is essentially a visual step by step aid to making your pasta. I will type up an instruction guide and this picture will help you to keep a visual aid in mind as we go through the steps.

Firstly you will need to get out your flour, any flour will do you do not need to buy anything fancy. Start by pouring out 2-3 handfuls of flour on your counter or work station. Then with your fingers make a well in the center of the pile of flour (look at the top left picture above). How much flour you use will only dictate how much pasta you make if you don’t add enough so be generous.

Next we will be cracking some eggs and pouring them into the well you made. Essentially your making a flour and egg volcano but nothing is hot and nothing will explode. The eggs are what dictate how much pasta you will make. There is no quantitative recipe for this, if you crack say 2-3 eggs and you need some more pasta by the end than just make some more, no biggie. If you crack to many eggs and have to much pasta that’s fine too then you have lunch for tomorrow.

Now grab your fork and start beating the eggs gently in the well of flour (second picture). You should notice that as you are whisking the eggs that the flour is combing in the eggs this is what you want. Do not just throw everything together willy nilly, this will either result in a too dry pasta dough and it wont form into the pasta shape. Or a too eggy mixture that wont stay cohesive and pliable it will just be goop.

As you incorporate more and more flour you will notice that your eggs mixture will get more thick (third picture). When the mixture in the well is too thick to continue whisking with a fork you may then get your hands dirty and start kneading the dough in the flour.

Your dough right now is going to look scraggly and not cohesive. This is because there is too much air in the dough and the gluten has not formed into stands. Don’t worry if you don’t know what I’m talking about this part is chemistry. What you need to do is start pushing and kneading the dough. I recommend looking at the video I linked above for this step so you know what I’m referring to.

Once your dough has the consistency of playdough, as a result of the 10ish minutes of kneading you’ve done. You may now wrap it tightly in plastic wrap and leave to sit at room temperature for at least 30 minutes. This step is necessary for the gluten in the dough to relax and become uniform and have the texture of pasta. If you were to cook it now the pasta would be gooey and unappetizing.

After those 30 minutes have past take you pasta dough ball out of the plastic wrap and begin rolling it out with a rolling pin. You want it to be thin enough to cook without being raw, but also thick enough to not be translucent.

Now take your knife and cut the pasta into your desired shape. If you want spaghetti then cut it very thin and slightly roll the strands to create a thin spaghetti shape. If you want fettucini then roll the pasta into a tube and carefully cut it so not to pinch the pasta together (do a sawing mothing with the knife to avoid this). The shape you make of your pasta is entirely up to you.

After you have gotten your desired shape all that is left to do is once more flour each strand of pasta gingerly so that they do not stick together. Then cook your pasta in salted boiling water for roughly 90 seconds. Yes this is a very short amount of time for cooking pasta but fresh pasta is very quick to cook. Its not nearly as dry as store bought so you don’t have to spend a while cooking it.

How to Cook Pasta: All the steps for perfect pasta recipes | Eataly

Now your ready to cook your favorite pasta dishes with your homemade pasta. I can tell you for certain that you will be the envy of your family and friends for showing them the delicasy that is fresh homemade pasta. If you are wondering how to do this with the pasta machine or the stand mixer I will refer you to the video above. Binging with Babish has helped me in great ways to get excited and skilled in cooking and I refer you to his widow to help you with these steps. Also this is due to myself not owning a stand mixer and pasta machine and have no real world experience in making fresh pasta this way.

Health Benefits to Take Up Cooking

Photos - Father and son preparing food in kitchen - YouWorkForThem

Cooking is such a useful hobby to undertake for not only homeowners and heads of families, but also to everyone in general. Constantly, the act and hobby of cooking at home is viewed as a chore and bothersome activity. But there are mental and health benefits of taking up this endeavor which, in my opinions, is beneficial and therefore necessary to not only myself but to everyone.

I recently read an article on the mental and physical health benefits of cooking, made by Alice Gomstyn an article wrter on AETNA.com where she listed off four of the reasons why cooking is not only fun but beneficial to a persons health and mental state. And you will find below the same list and a summary of what she had to say for each of these points.

Culinary Lingo

1.) You Eat Fewer Calories Without Realizing It

Having the ability to pick and choose your own ingredients for the food you prepare gives you a serious leg up in your ability to pick healthier options for food without having to compromise by not eating the foods you like. If you like pasta then get gluten free pasta or try spaghetti squash. With cooking your own food you have the great ability of knowing exactly what your eating and putting in your body. We have become complacent and dependent of the restaurant industries and they are constantly frying and using unhealthy methods of cooking to get good flavors. But there are healthy ways of cooking and still enjoying the food whilst being able to maintain calorie input.

2.) Your More Mindful Of What Your Putting In Your Body

This point is a tad derivative of the first point however it has its own merits. Having the ability to pick and choose your own ingredients to you specific palette and taste is a necessary step to regulating what food you put into your body and furthermore cuts off your dependence to the restaurant industry. Gomstyn talks about how when we are multitasking we tend to compromise about how we don’t regulate the foods we eat in order to save time.

3.) You can Socialize With Loved Ones

Cooking is not only beneficial to your own health and mental health but that of your family. It is not only considered beneficial to ones self helth but cooking is a strong social activity to further yourself and your family. Some of the funniest and lively conversations I’ve had with distant or near relatives has been around a dinner table or in the kitchen. Food is the great unifier in family stability. And some of the greatest moments of connections we can have with our family members can happen by cooking a great meal for our family to enjoy. Cooking food for your family shows commitment and love for the people closest for you.

4.) You Stimulate Your Mind

Having a creative activity like cooking helps to stimulate your mind and not only better your mental help but stimulate your mental stability. This is especially true in older men and women. Gomstyn talks about how once we get older not only do we get more fatigued but we also have an onset of a cognitive decline. Cooking is a great mental activity to work out the creative parts of your brain, and also the primary motor functions in our nervous system. Its like a mental workout that results in a homemade treat afterword.

Conclusion

Elderly chefs Stock Photos - Page 1 : Masterfile

There are far more websites that will tell you that cooking is not only beneficial to your body, but also to your mind, the social fabric of family life, and to our general happiness in the long term. Cooking is a past time that requires focus and precision that cannot be compared to with video games or other tech-gadgets that we distract ourselves with today. I would furthermore stipulate that cooking is a necessary tool that everyone should learn and take it upon themselves to be creative and passionate with.

DS106 Assignment: Turn a GIF Into a FIG

I recently saw a video on Youtube where a man traveled to the Ice Castles in Laconia New Hampshire and did a performance where he both breathed fire and twirled flaming metal rods in a spectacular fashion. This video was in 4K resolution and it was just incredible to watch fire come into contact with ice. These two elements of extremes come into contact through mans will which I find incredibly beautiful.

The Art of Cooking With Pasta

Pasta Recipes : Food Network | Food Network

Pasta is one of the most versatile ingredients to use as a base of a delicious dish. And many of us know wonderful recipes which incorporate this versatile ingredient fantastically. However not many of us know how to be “scrappy” with pasta and in general other ingredients. Not many of us know how to go into our fridge or pantry, and not have a recipe or dish in mind when we cook. Today we have lost our ability to be creative in the kitchen and to create our own dishes or spins on dishes we all know well. In this post I am going to take us back to school and teach us fundamental ways of cooking with pasta that not many of us know about.

Many cultures around the world use pastas or some variance of this ingredient as the base of many dishes. And many of us home cooks copy and make these dishes at home to try. But not many of us know how to merry ingredients together to make something new. Even I struggle with doing this, but cooking with pasta can be an easy way to get creative with a pan again. And in understanding how restaurants and chefs use pastas and sauces can give us the foundation to creativity.

First Steps:

Newsflash! Salt Does Not Make Water Boil Faster - Simplemost

When making a pasta dish there are hundreds of sauces, ingredients and paths you can take to making a delicious dish. In this blog post we will be covering a white sauce or most commonly known to as a cheese sauce. Our first steps in this process are to first be boiling water. We all know how to put water into a pot and heat it up to a boil. But there are ways in which people differ on how to prep the water for the pasta to be introduced. Some people put oil in the water or some kind of seasoning to season the pasta. I am going to unequivocally tell you that these are not necessary. The only preparation you need to do is salt the water.

Salting the water is not only a traditional step in Italian cooking when using pasta. But it also seasons the pasta and ensures that the pasta does not stick to itself. Putting oil in the water does not ensure the pasta will not stick to each other because the oil floats to the top of the water and hardly comes in contact with the pasta.

Salting the water also seasons the water itself, which is extremely important because the salted and starchy pasta water will be the base of your sauce. Not many people realize but when you make a sauce out of cheese and oil or butter it does not stick to the pasta very well and the cheese itself does not emulsify in the oil. If you have every put, for instance, parmigiana cheese in pasta with oil the cheese itself clumps up and does not get creamy.

This youtube video by Bon Appetit is a wonderful instructional video on how to be creative with your ingredients and merry them with a sauce in the pasta. And it speaks to how to instead of wasting the wonderful starchy water you make use of it as the base of your sauce. By watching this video you will not only learn to make a great cheese sauce, but also be able to have flexibility in your choice of ingredients and merry those ingredients and pasta to your sauce instead of having vegetables, pasta and a sauce at the bottom of your bowl.

My Favorite Recipe: Gumbo Part #2

After my first post on my favorite recipe Gumbo (posted on 6/3) I thought it would be helpful to provide a step by step instruction to guide you along the process. The steps required can be tricky and there are certain tips and tricks not gone over in the video of Isaac Touppes cooking that I linked with my original post that I feel should be itterated. The most daunting task in the process is suprisingly one of the first, this being the roux which we will get to shortly.

Step one: PREP EVERYTHING

Preparation is one of the most important steps you should do not only in making this dish but in making any dish. It makes the difference not only in taste but also the quality of the dish overall and the plating of the dish. Firstly what you need to do is to lay out all your ingredients in front of you and have them nearby so that when you begin to cook you do not have to go into the pantry, cabinets or refrigerator to get anything.

This is how people make mistakes in cooking. Leaving the food on the stove or oven too long while you are distracted looking for another ingredient is a good way to burn your food. So what you need to do first in gumbo-prep is chop all your veggies, the onion, bell pepper, garlic, jalapeno and celery.

Then prepare your meats for cooking. Take the chicken out of the fridge and season both sides with salt and pepper. Seasoning early helps to draw out unnecessary moisture and keeps less on your plate to deal with later (yes that was a cooking pun and I’m very proud of it.) Then chop up your sausage into whatever kind of shape or preperation youd like. I made medallions but you can take the sausage out of the casing and crumble it in for smaller bites. Make sure your sausage is a smoked sausage they have more flavor and you dont have to cook them before hand. You can find a comprehensive list of all the ingredients in my last gumbo post.

Now to prep for the roux. What you will need to prepare is the fat and flour in equal parts. The fat being a high smoke point oil, or an oil which does not burn easily on high heat. These will typically be your canola oils, grape seed oils or vegetable oils. I dont reccomend using peanut oil or olive oil because the peanut oil has a strong flavor to it and will come off sweet in the dish and olive oil will dye your roux a green ting and will burn easily. Take two measuring cups and measure out equal amound of each (oil and flour) between a half a cup to one cup typically depending on how many people your serving. DISCLAIMER! DO NOT USE BUTTER FOR A ROUX! Butter burns extremly easy in a roux only use butter if the recipe specifically calls for it, this will typically be in desserts or bechamels possibly.

Step two: THE ROUX

Making a roux can seem simple but it can be extremely tricky. This will be the most challenging portion of the cooking you will do today. What you are going to need is a large pot, I would not recommend using plain cast iron because it conducts heat too good and will get too hot too fast. use instead a porcelain, metal or even porcelain coated cast iron pot. A Dutch over would be a great alternative to a pot as well.

What you are going to do is bring the pot onto the heat (be that flame or other) and bring it to a medium heat. If you have never made a roux before go with medium low. If you have and you are confident with how to do this and feel a little daring bring this to a meduim high, the teampterature should reflex your cooking experience.

Pour the oil into the pot and wait for it go get hot, then pour in the flour and immediatly stir to forma slurry. This is the beginning of your roux. The picture above will show you the different colors/stages your roux will go through. You will begin with a white roux, nothing is technically cooked yet. Then the more you stir and the longer you go the roux will change from a blond roux to a dark roux. You want the color of this roux to essentially be the color of a melted Hershey chocolate bar.

DISCLAIMER!!! DO NOT LET THE ROUX COOK WITHOUT STIRRING! IT WILL BURN!

The reason you stir it constantly is to make sure none of the flour sticks to the bottom of the pot and burns. It does not matter if you have a non-stick it will stick and burn.

DISCLAIMER!!! DO NOT TOUCH OR TASTE THE ROUX! YOU WILL BURN!

In the south a popular name for a roux is Cajun Napalm. When you make a roux and turn it from a blonde to a dark roux it gets incredibly hot! Please do not touch it you will get burned no matter how low your heat is. It is seriously really hot.

If you end up burning the roux its okay just start over. It happens to the best of us. A popular phrase that Issac Touppes is known for saying is, “If you aint never burned a roux, then you never made one.” I have burned a roux once, the mistake I made was letting someone else watch the roux while I went to the bathroom. When I came back it was pitch black. Burning a roux is no big deal because you have not wasted any expensive ingredients. Its fine dont get discouraged.

Step three: COOK THE VEGGIES

Once your roux is cooked to the proper color (Hershey chocolate brown) place all of your vegetables in the pot with the roux, except the garlic. DO NOT JUST DUMP THEM IN! Gently place them in the pot, if you were to dump them all in carelessly them your roux would splash up and most likely burn you. Be careful. Once they are all in the pot season them with salt to help release the moisture. Cook these vegetables down for roughly 5-7 minutes or until your onions begin to turn translucent. Once this happens then you may put your garlic in. The reason we didnt put the garlic in with the veggies and also why we only seasoned with salt and not pepper is because the garlic and pepper would have burned too quickly. Once you put the garlic in stir in order to incorperate the flavor and to not burn the garlic, cook that for 1-2 minutes.

Step four: ADD THE STOCK

Pour in your chicken stock slowly at first. Initially add roughly 1-2 cups of stock and stir the ingrediants in the pot for a minute or two. Then once you add the rest of the stock do so slowly as well whilst stirring. If you were to dump all of the stock at once your gumbo would become lumpy and unappealing. This is because your flour from the roux would congele with the stock to make these lumps. You stir the stock in slowly to emulsify the flour into the stock to make one cohesive base to your soup.

Step five: SEAR YOUR MEAT

This step is going to be different for many of you who decide to go with alternative meats rather than chicken. I will first go over the steps for a chicken gumbo then will talk about alternative meats afterwards.

For those who are cooking with chicken breast or some other cut of chicken. Do not be alarmed at what I am about to tell you. Don’t worry about cooking the chicken all the way through right now. If you want to its fine no big deal it wont change anything. If you don’t care right now like I do also no big deal. You will not get salmonella later because the chicken will continue to cook in the gumbo later. Right now all we want to do is sear the outside of the chicken to get it crispy and to develope flavor.

Season the chicken on both sides with salt and pepper if you haven’t already (it should be raw right now). Place a sautée pan over medium high heat and get the pan hot. Place in the high smoke point oil of choice and wait for the pan and oil to get hot. You should not flood the pan with oil but just enough to be able to roll the oil around the pan to get the oil covering it.

Place your chicken in the pan, laying the chicken away from you so not to splash any oil on you. If the chicken doesn’t sizzle in the pan when you lay it in, don’t put the chicken in. Once you have the chicken in the pan let it sit there until it sears on one side. The picture above is what your looking for when you flip over the chicken. You can even get it darker than this and I even recommend it. It adds more flavor and texture to your gumbo. Your not really timing the cook on this chicken right now its not important your looking for the crispiness and browing of the chicken.

If you are not using chicken then you should be cooking your meats according to FDA standards. Ground pork is a good alternative to chicken. Just cook it and break it up int eh pan like the chicken and cook out any excess water and remove the fat afterwards. If your cooking with seafood liek shrimp or crawfish you dont need to cook it like the chiken just throw it in the gumbo and skip this step.

Step six: PUT YOUR MEATS IN THE GUMBO

This is pretty self explanatory. Place your sausage and meat of choice in the gumbo and stir it around to make sure nothing is burning on the bottom. Throughout this process your going to be stiring the gumbo and if cooking with chicken breaking apart the chicken with a stirring spoon.

Step seven: PLACE IN SEASONINGS AND HERBS

At this point all of the hard work is done and all that is left to do is add the seasonings, herbs and to let it stew. Add in your bay leaves (5), fresh or dried thyme flowers (1 tbsp), creole seasoning to taste, salt and pepper. A couple things to note in this step. If your using fresh thyme, do not just chop the thyme up with the sprigs attached. Those do not cook down and will taste and feel like sticks when you eat them. Take the flowers off the branches and put those in only. With the creole seasoning typically they already come with salt in them so season accordingly to taste.

Step eight: REDUCE HEAT AND STEW

Now we are in the endgame. All of the hard work is done and all that’s left to do is babysit the gumbo. You want to reduce the heat down to where the gumbo is barely bubbling. Ever stove is a little bit different so on mine (which is a gas stove) even when I was all the way on low the gumbo was still bubbling a lot. Its all dependent on your individual stove. Find that point where the gumbo is bubbling and let it simmer on that temperature, covered with a lid partially for a minimum of 3 hours. This is to ensure that the roux fully cooks out and that the sausage and other meat infuse their flavor into the gumbo. I reccomend begining this entire process in the morning and letting it stew all day to be served at dinner time. The longer it stews the better it gets. Throughout the rest of the process of it stewing and fully cooking out the roux continually sitr it every 5-30 minutes to ensure that nothing gets stuck on the bottom and burns.

Step nine: SERVE OVER RICE

Once your three or however long after hours are up serve the gumbo over white rice with chopped scallions on top. White rice in this dish is traditional in cajun cooking and it helps to sop up all the delicious juices in the gumbo. And the callions provide an extra onion crunch which helps cut through thr richeness of the gumbo. I hope you all enjoy this dish it is one of my all time favorites to cook and I hope it will be yours too.

My Favorite Recipe: Gumbo

Gumbo, the staple dish from The South is a heartfelt and delicious dish well known to keep you warm during cold nights and begging for second helpings. This by far is not only one of my most favorite dishes to eat but also to cook. Slow cooked stews can be a daunting task to undergo but the results are more than impressive. And if you know the proper techniques then this dish and many more like it will become second nature to make. And this all begins with your ingredients and preparation.

Ingredients

Gumbo is delicious and heartfelt dish which you can mix and match quite a lot of ingredients in. I will first tell you what you absolutely must put into your gumbo because these are the necessities. Firstly you most have flour and oil. I recommend using all purpose flour and a high smoke point oil (an oil that does not burn easily) which would mean canola oil, vegetable oil or grapeseed oil. This is going to be the base of your gumbo called a roux. Next comes the mirequoi or trinity in French. Nearly every Cajun dish will include the trinity. This being bell peppers, onions and celery. It originally comes from France hence the word mirequoi, but in France they substitute celery for carrots because carrots grow more prevalent in France than in the southern United States. Next we will require one large jalapeño and 6-8 cloves of garlic. Yes this is a lot of garlic but don’t worry because garlic is delicious. And lastly for the necessary ingredients you will need about a quart of chicken stock, thyme, bay leaves, creole seasoning, salt and pepper. A comprehensive list of all the ingredients can be found below.

  • kosher salt, to taste
  • black pepper, to taste
  • 1/2 cup all purpose flour
  • 1/2 cup canola, vegetable or grapeseed oil
  • 6-8 cloves of garlic (crushed then minced)
  • 2 ribs of celery
  • 1 jalapeño (take out most of the seeds but don’t stress if some stay in its just adds a little extra heat)
  • 1 green pepper (diced)
  • 1 yellow onion (diced)
  • at least 4 cups of chicken stock
  • fresh thyme (1-2 teaspoons)
  • 5 bay leaves
  • cayeene pepper or creole seasoning (I recommend Tony Carchere’s creole seasoning)
  • cooked white rice
  • scallions
  • some sort of protein (chicken breast, chicken thighs, ground pork, etc.)
  • your choice of smoked sausage
  • optional vegetable (typical Cajun cooking includes Okra, a vegetable found in the south)

There are a few ingredients that you can really mix and match with in this dish. What I mainly mix and match with in gumbo is the proteins, that being the sausage and main protein (typically chicken). Through my time mixing and matching I have found my personal preferences to how I make gumbo in this protein regard. I found that I enjoy using chicken breast and Andouille sausages. The chicken breast pulls apart after stewing for a while so that you get these delicious strings of chicken in every bite similar to pulled pork. And the and andouille provides a spicey and sausage taste to the dish that you most definitely need. However you can mix and match these proteins to your own taste for instance a nice alternative to the chicken would be ground pork or another classic Cajun protein, crawfish. And a nice alternative to andouille is kielbasa or any other smoked sausage.

I highly recommend watching this video by munchies starring chef Isaac Toupes, owner and chef of Touppes Restaurant in New Orleans, Louisiana. He provides a comprehensive tutorial on how to cook gumbo and makes it comical at the same time. Everyone should try gumbo at least once and I will be going over in another post the necessary steps to make the gumbo because it can be tricky. But if you follow chef Isaac Touppes and my instructions not only will your dish be delicious but it will also give you a foundation for other amazing Cajun meals.

Selfie With Your Pets

My family and I are obsessed with big dogs. Great danes, german shepherds, Siberian huskies and about a million more. Big dogs are by far the best friends you can ask for. They are goofy, adorable, loyal and full of so much love for their people. And my dogs are no exception. Maverick (the all white dog) is the oldest of our two Great Danes. He’s sweet and gentle and incredibly funny.

My next dog is Buddy, he is the youngest of the three dogs I have and he is another great dane. All of the emotional qualities that Maverick has, Buddy also has but dialed up to 11. Out of the three of my dogs Buddy is by far the most goofy and it is wonderful. He will keep you laughing and laughing all day he never stops his goofiness.

And last but not least comes Cooper. He is an austrailian blue heeler mix from Mississippi. He was rescued from a tornado and put up for adoption which is how we found him. He is an incredibly happy dog all the time, never in a bad mood and always looking for food. He is never not hungry even though we feed him throughout the day.

Knife Skills In The Kitchen

When considering taking up cooking, all aspiring chefs must learn basic knife skills. A knife is one of the most versatile tools a chef has at their disposal. Although its main purpose is to chop and cut, a knife is a chefs best friend in the kitchen and every chef has their out kits with knives they trust and feel good in their hand. And yet knives are considered one of the most dangerous tools in the kitchen and every aspiring chef or home cook must learn the proper techniques involved in cutting and chopping with a knife.

The Basics:

It is now no secret that I could be considered a fan boy of Gordon Ramsay. But in fairness his skills in the kitchen are supreme. In comparison to other famous chefs around the world he is most certainly one of the top 5 most influential and skilled chefs in the world. And his knife skills follow suit in this regard. Through watching his youtube videos and recipes he implores the same basic skill of a technique colorfully named “the claw.” Which hysterically and immediately reminds me of “the claw” from toy story.

The Claw Technique:

This technique is the base skill used in all cutting and is the safest technique in using a knife. As you can tell by the image above this technique was named the claw due to the forming of the chefs hand over the produce. The logistics of this technique is to keep the front knuckle of your index and middle finger against the flat side of the knife and to glide the knife against it to keep the blade straight and in place. Also you can see from the photo that the finger nails and tips are bent behind the knuckle. This is so that when you bring the blade down to cut you do not slice open the tip of your finger or nail. And as your index finger and middle finger are gliding against the side of the knife, your other fingers are pressed against the produce in order to keep it stable. This is the basics of cutting and chopping. This is the first technique all new chefs learn in order to properly handle a knife safely and effectively in professional kitchens. And not only do professionals in the kitchen employ this technique but every new cook should practice this and try to perfect this.

Gordon Ramsay’s Masterclass: Is it worth it?

Throughout my day to day I find myself watching a considerable amount of youtube videos. With video topics ranging from video games, to movies, politics and of course cooking. And within my cooking videos I would estimate that 60%-80% of them are Gordon Ramsay cooking tutorials and recipes. And do to this abundant watching of his videos I began receiving advertisements about his masterclass, specifically a youtube ad with him promoting this masterclass (video below).

What is Masterclass?

Masterclass is a website designed to provide video tutorials and teachings of some of the worlds greatest professionals in regards to their fields. It is a collection of teachings by world class professionals in fields of science, literature, arts, language, civics and many others. It is designed to educate and inform people in topics they are passionate about and is done so in a way that captivates the audience and provides a sense of legitimacy in those fields. This is done by having prominent celebrities and people like Neil Degrasse Tyson, Gordon Ramsay, Steve Martin, Natalie Portman and many other experts teach you their tips and tricks in their respective fields.

Gordon Ramsay’s Masterclass

Gordon Ramsay has now published his second Masterclass on the Masterclass website. He educated his viewers on techniques and tricks he has learned throughout his time as a chef learning techniques in France and England under the tutaligue of world class chefs such as Marco Pierre White and the techniques and recipes he perfected as a Michellin star chef. In his second masterclass he teaches the audience the recipes listed below along with techniques himself and other elite chefs are using around the world.

  • Red Wine Poached Egg, Sautéed Asparagus, and Purée With King
  • Trumpet Mushrooms • Crispy Duck with Red Endive and Spinach
  • Pomme Purée
  • Charred Cauliflower Steak With Olive Pistou and Porcini Mushrooms
  • Rack of Lamb with Thumbelina Carrots
  • Roasted Turkish Spiced Eggplant With Fresh Basil and Feta Cheese
  • Grilled Baby Leeks, Miso Broth, and Caviar Vinaigrette
  • Szechuan Roasted Whole Chicken
  • Hoisin Chicken and Pickled Daikon
  • Szechuan Chicken Breast and Udon Noodles
  • Sesame Seed Crusted Tuna Loin, Pickled Cucumber Salad, Yuzu- Sesame Seed Dressing, and Microgreen Salad
  • Crispy Whole Fried Branzino, Thai Chili Dipping Sauce, Lettuce Cups, and Assorted Pickles
  • Raspberry Soufflé

Is It Worth It?

To put frankly no, Gordon Ramsays Masterclass is not worth it in my opinion and I will tell you why because I have left out the most important information until now for dramatic effect. You have to pay $180 to watch his videos, of which there are only 6 (yes there are technically 8 but the intro and conclusion videos are less than 5 minutes long so I do not count them). Which you can opt to pay in the form of a monthly bill of $15 annually. The internet is a vast space full of useful tips, recipes and told you can use for cooking. I agree that learning it from Gordon Ramsay himself is a unique opportunity. However, you can easily learn all the tips and recipes you wish to learn from youtube. There are hundreds if not thousands of youtube videos regarding Gordon Ramsay and his cooking all of which are free. I highly reccomend to everyone to learn cooking, its a wonderful skill to have. However I do not think it is worth $180 to pay for to only learn 2 hours worth of cooking. Instead go to Gordon Ramsays youtube channel and watch his cook hundreds of various mouthwatering dishes and cook along side him that way. Youtube is my favorite way of learning how to cook and Gordon is a wonderful teacher. I’m just not willing to pay for it.

https://www.youtube.com/user/gordonramsay

css.php